Personalizing Single-Record VDPs
Some variable data products (VDPs) are designed to be personalized one at a time, to address a single situation. One example is a note pad to which you add a logo and some text; another example is a business card that you personalize with information for one person (like yourself or one member of your organization). (Other VDPs are personalized several at a time.)
Depending on the product, sometimes you fill in a form (for example, provide your contact information) and other times you select information from a Data Source. For example, an address book that your company makes available. In addition, for some products you can upload your own image to personalize the product or select an image from a gallery.
When personalizing the product, you work in a window with two panes: Personalization and Preview. Initially, the Personalization pane is open and the Preview pane is minimized (closed). After you enter or select the data for personalizing the product, you review your personalized product in the Preview pane. Here are some tips for working with the two panes.
Notes: Some products are hybrids and offer a choice of Single Mode or Batch Mode. If you select Batch Mode, you personalize multiple records at a time. This topic covers Single Mode – here you personalize one record at a time. Some products may be available in both printed and/or downloadable form. In this case, in addition to (or instead of) obtaining the printed copies of the product, you can order a digital download of the production PDF. If different deliverables are available for a product, you select what you want to order after you click Buy Now.
Provide Required Information
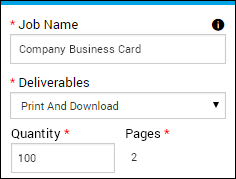
- In the Job Name field, enter a descriptive name for the job so that you can identify it easily.
- If the Deliverables field is displayed, it is set to what you selected after you clicked Buy Now. If necessary, change your selection. This selection affects the price.
- Enter the Quantity you want to order.
Tip: You can click Save (at the bottom of the window) at any time to save the job. This allows you to return to the job later.
Personalize the Product
The options available to personalize a product depends on the product you selected.
If you must complete a form
For some products you must complete a form (there is no data to select). Enter information in the fields that make up the form. Be sure to complete any required fields, identified with an asterisk (*).
Note: You may be stepped through the process of filling out the form. For example, you may need to make a selection in one field before other fields are displayed. Sometimes fields may be filled in for you automatically. For example, after you select a company, its location may be automatically filled in. Likewise, if you select your name, the contact information from your user profile may be automatically entered in the form.
If you can select existing data
For some products, you can select information from a Data Source such as a company address book or other list. If a data source is available, the Select Data Source field is displayed at the top of the window above the form. You can also right-click inside the pane choose Select Data Source.
Tip: You can always enter information directly in the form instead of selecting it from a data source.

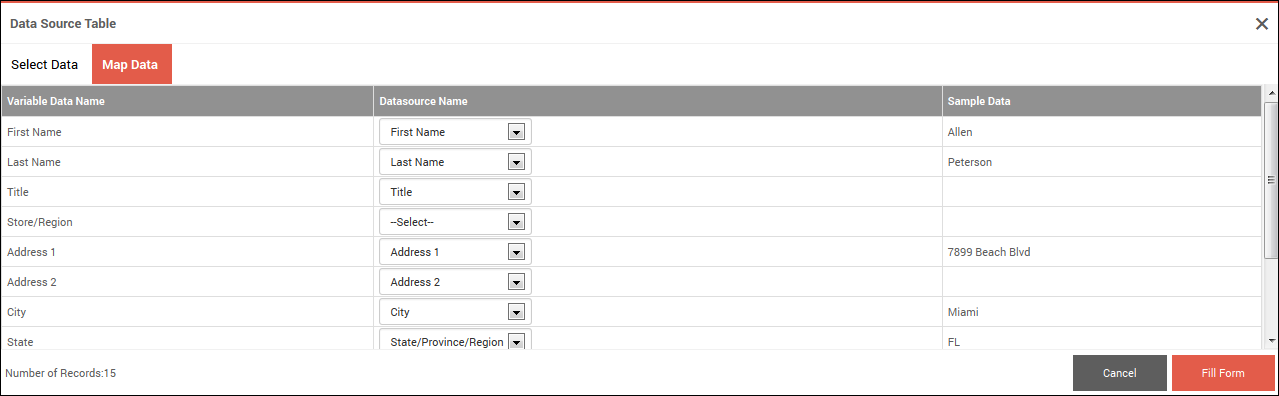
- Select the data source you want to use, for example, Address Book. The Data Source Table window opens and lists the selections available to you.
- If the list is long, you can sort it by a particular column: Move the pointer over a column heading and click Sort Ascending or Sort Descending.
- To restore the original sort order, move the pointer over the column heading and click Remove Sort.
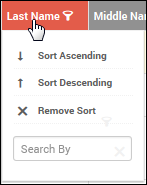
- To search for a record, move the pointer over the heading of the column where you want to search,for example, Last Name and enter what you want to find, for example, Smith in the Search by field. To remove the search results and restore the full list, click Clear Search.
- Select the data you want to use and click Mapping. The Data Source Table window now shows how fields in the data source are mapped to fields in the product form.
- Review the mapping and, if necessary, correct it by selecting a different field in the Datasource Name column. The Sample column helps you see how data is being mapped.
- When you are satisfied with the mapping, click Fill Form. The data you selected from the data source is now displayed in the form, where further changes can be made if required.
If you can add an image
Some products can include (or require) images:
- Either click Upload Image to provide your own image or click Select from Gallery to choose an image from a gallery of pre-supplied images. What you can do depends on the product.
- You may have the option of editing the image. If
 is displayed, click it to rotate the image or to adjust the fit.
Note: For some products, if you edit a CMYK image (in PNG or JPG format), a message in the Edit Image window informs you that you may see some color discrepancies in this window. The colors in the preview (step 4 below) and in the production PDF, however, will be accurate.
If you can format text
Some products let you format text in certain fields. For example, you may be able to change the font, point size, style, or color of the company name in a flyer. When you can format the text in a field, a formatting toolbar is displayed so you can make your selections.
If print options are available
If the left-hand pane includes print options (for example, a choice of Media), make your selections.
Note: If you are ordering a download version of the product, you will receive the PDF file that forms the basis of the product. If you are ordering print copies together with the download version of the product, the downloaded PDF will not reflect tabs, Media size or color, orientation, or other print options that you may be able to select for your printed copies. The print options apply only to the print version of the product. Some of your print option selections may result in messages about incompatibilities with previously selected options, recommendations for other or alternative options you should consider, or notifications that your selection resulted in another print option being automatically enforced (selected for the product).
Preview the Product
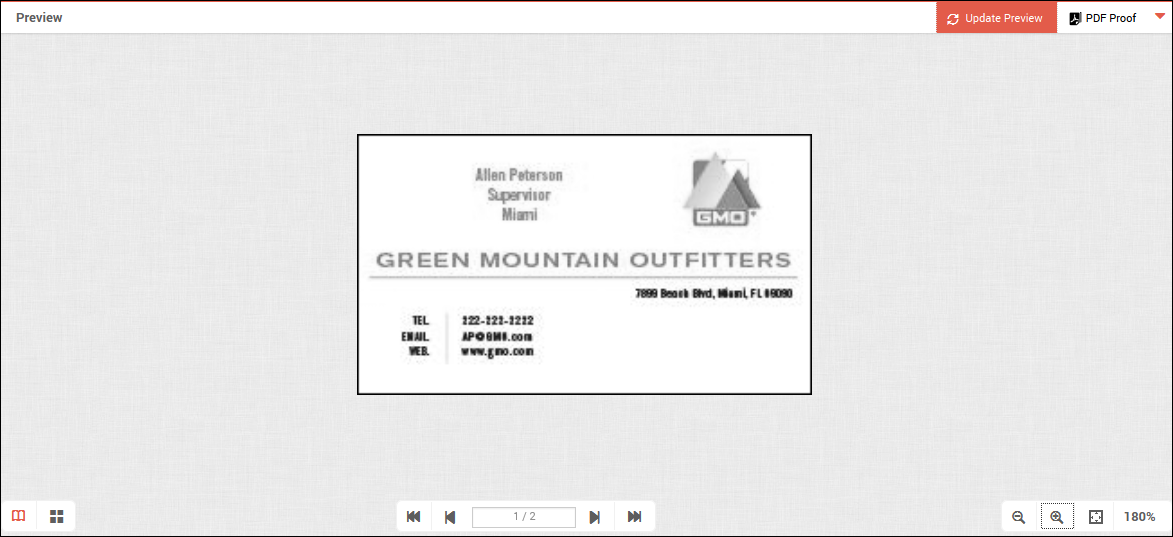
After you personalize the product with your data, you must preview the product before you can add it to the cart.
- Click Update Preview. The Product Preview pane opens so you can review your product. If you selected print options, the preview will reflect them.
- Click
 to zoom in or
  to zoom out. To restore the preview to its original size, click
  .
. - To see what the printed version of the product will look like, click PDF Proof.
- If the product has more than one page, Preview each page by using the page buttons, making changes, as required.
- If the product has multiple pages, you can click
 to switch to thumbnail view and click
  to switch back to spread view.
Add to Cart
To see more pricing details, hover over the Unit Price area at the bottom of the window. If you are ordering both a print and download version of the product, the pricing summary provides a breakdown. A pricing summary is not available for all products. When you are satisfied with your product, you can add it to the cart:
- Click Add to Cart. If the product is part of a kit, a Finish button is displayed instead of Add to Cart. Click Finish to continue with the process of ordering the kit.
- If asked, click Approve to confirm that you reviewed the product and are satisfied.
- Proceed with the checkout process when you are ready.
Working with Personalization and Preview Panes
At times it is helpful to have just one pane open. For example, when you are previewing the product you may want to view it in a larger space. At other times, it is helpful to see both the form and preview at the same time. You can control what is displayed like this:
- To open or close a pane, click its title bar. When you close one pane, the other one opens.

- Alternatively, to close a pane, right-click its title bar and select Close Personalization Panel or Close Preview Panel.
- To have both panes open at the same time, click Split Window at the top of the page. Alternatively, right-click inside a pane and select Split Window.
- To return to a single-pane view when the window is split, click the title bar of the pane you want to close.